[Previous]
[Contents]
[Next]
 [Comments or questions]
Copyright © 1996-2001 jsd
7 More About Energy and Power
-
-
-
- Don't worry about ridiculous lies.
- Worry about plausible lies.
- Don't worry about things that confuse you.
- Worry about things that you know for sure,
because not all of them are true.
7.1 Introduction
There is an age-old conundrum in the pilot community: Some people
suggest that the yoke controls altitude while the throttle
controls speed (just like in a car). Other people suggest just the
reverse, namely, that the yoke controls airspeed while the throttle
controls altitude.
So, which is correct?
Answer: neither one is correct. Both suggestions are based on wishful
thinking. You might wish for an airplane where one control
changes altitude and nothing else, while another control changes speed
and nothing else, but that is not how real airplanes work.
The truth is simple enough:
-
The yoke (in conjunction with trim) controls
angle of attack, and hence determines airspeed. Airspeed is linked
to altitude via the law of the roller-coaster and via the power
curve.
- The throttle controls power. Power can be used
to overcome drag, to accelerate, and/or to climb.
This is the right way to think about the issue.
I like to say ``the yoke is the main speed control,
but it is not just the speed control''. That is, if
you want to change speed you simply must move the yoke and/or
trim.1 However, moving
the yoke and/or trim has multiple effects: there is a not just
a speed change but also a short-term change in altitude because
of the law of the roller-coaster,
plus a long-term change in altitude
because of the power curve.
Your piloting performance is sometimes judged on
how well you maintain your assigned altitude and airspeed. Since
you do not have a simple up/down control or a simple fast/slow
control, even seemingly simple maneuvers require using combinations
of controls. Let's look at some examples.
7.2 Making Changes in Airspeed
Once upon a time, a friend of mine bought a fancy new airplane.
Although he already had lots of experience piloting complex aircraft,
this was a step up in performance, so he thought it would be wise to
take a week-long course at an internationally-famous training center.
He also got lots of other instruction in the new plane. Even so,
after dozens of hours of experience in the new plane, he still didn't
feel ``in command''. He kept getting into unpleasant high-workload
situations. Among other things, he complained that it took forever to
get the thing slowed down.
When I discussed this with him, it didn't take long to discover a
couple of easily-fixable problems. For starters, he had been told to
control airspeed using the throttle. He had the firm impression that
to reduce speed somewhat, he should just close the throttle somewhat.
I pointed out that such an idea couldn't possibly be right, for two
reasons:
-
Being high and fast is very different from being low and fast,
so any rule of the form ``if you are fast do such-and-such'' must be
dangerously wrong.
- Even when the right procedure calls for closing the throttle,
you don't ``just'' close the throttle, for reasons that we now
discuss.
This discussion assumes you want to change airspeed while maintaining
straight-line flight. This includes straight and level flight, and it
also includes the important case of final approach, where you are
descending on a straight line, following a nice stable glideslope.
7.2.1 Front Side of the Power Curve
Figure 7.1 shows the obvious but not-recommended
procedure for decelerating on the front side of the power curve.
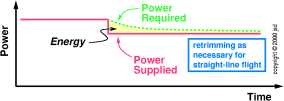 Figure 7.1
: Slowly Decelerating on the Front
Side of the Power Curve
Since flying at lower speed requires less power, if you just reduce
the power the right amount (as shown by the solid red curve), the
airspeed will eventually dribble down. The power required is shown by
the dashed green curve; it gradually decreases as the airspeed
decreases.
The problem with this technique is that the airspeed keeps decreasing
for a very long time. You will need to retrim over and over and over.
Slowing down means shedding kinetic energy. The area between
the two curves2 shows exactly how
much kinetic energy you have shed.
Figure 7.2 shows a much cleverer procedure. The idea is
to make a temporary reduction in power that is big enough so
that the airplane decelerates in a reasonable time. Then you can
re-open the throttle to maintain the desired final outcome. If you do
a little extra work with the throttle, you will do a lot less work
with the other controls — and you will get a nicer result (faster
deceleration).
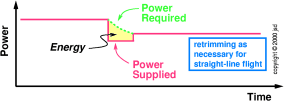 Figure 7.2
: Cleverly Decelerating on the Front
Side of the Power Curve
Remember, deceleration requires shedding kinetic energy, as
indicated by the area between the curves. The area in this figure is
the same as the area in the previous figure; we have just
``collected'' the area so that we can shed the energy in a
reasonably short time. That means you don't have to spend the rest of
your life re-trimming as the airspeed gradually changes.
7.2.2 Back Side of the Power Curve
Imagine you are on final approach. On long final
you are maintaining a speed near VY (a normal
approach speed in many aircraft), using 1700 RPM of engine power.
Then, suddenly, the tower controller asks that you land and hold
short of a crossing runway. You decide to convert the normal
approach to a short-field approach. This requires decelerating
from VY to a somewhat slower speed. The procedure is shown in
figure 7.3.
You need to shed some kinetic energy, as shown by the shaded area in the
figure. Since that always takes time, you should immediately retard
the throttle. You are now getting rid of mechanical
energy (via drag)
faster than it is being replaced (via the engine). You want to pay for
this energy deficit by cashing in airspeed, not altitude, so you must
pull back on the yoke and then roll in some nose-up trim to get rid of
the force on the yoke. When the airspeed reaches short-field approach
speed, you re-open the throttle. Returning to 1700 RPM will not
suffice; you will need more power to complete the approach at
this low speed than it would have at the higher speed.
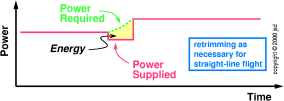 Figure 7.3
: Decelerating on the Back
Side of the Power Curve
This is an interesting contrast with the previous situation
(e.g. figure 7.2). The required power increases as
the airspeed decreases. Therefore you do not even have the option of
making the speed-change with only one power-change. It requires two
(opposite and unequal) power changes.
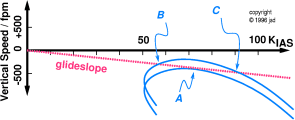
7.2.3 Right versus Wrong Procedures
Another view of what is happening is shown in
figure 7.4. The dotted line shows the descent rate
needed to remain on the glideslope as a function of airspeed. You
started out at point A, using 1700 RPM. You are now at point B,
using more than 1700 RPM to remain on the glideslope.
This combination of controls (close the throttle a little, pull the
nose up, then open the throttle more than a little) is the only way to
decelerate without an altitude excursion when you are in the mushing regime.
The analysis given above — thinking about
the energy change in terms of the area between the two curves — is
simple, practical, and absolutely correct.
In contrast if you tried to analyze this maneuver
in terms of an up/down control versus a fast/slow control, it
would be very confusing. Let's try it anyway.
-
Suppose you think of the yoke as purely the fast/slow
control and the throttle as purely
the up/down control. At the moment
you decide to convert to the short-field approach, your only problem
appears to be excess airspeed. Therefore you pull back on the
yoke. Poof! You decelerate sure enough, but you go above the
glideslope in the process. You notice this, and reduce the throttle.
You gradually descend back onto the glideslope. You re-open the
throttle to 1700. That doesn't quite suffice, so you slowly drop
below the glideslope. You notice this before too long and add
power. Eventually find the right combination of settings. Summary:
you get the job done, but it is rather sloppy. You have unnecessary
altitude excursions and airspeed
excursions, and you do some unnecessary work.
- In contrast, now suppose you think of the yoke as the up/down
control and the throttle as the fast/slow control. At the moment you
decide to decelerate, you close the throttle a little. Contrary to
your wishes, the airplane does not decelerate; in fact it probably
accelerates a little.3 You pull on the throttle a little more.
Still no deceleration. Now the airplane is starting to descend below
the glideslope. You notice this and pull back on the yoke. Now
things seem (but only seem) better, since you are now back on the
glideslope at a reduced airspeed.
At this point you are in real danger. You are losing
energy rapidly, because you are operating on a draggy part of
the power curve with a reduced throttle setting. The energy deficit
must be paid by cashing in altitude and/or airspeed. Unfortunately,
most pilots, especially beginners, pay more attention to altitude
than to airspeed. As you lose energy you will keep pulling back
on the yoke to maintain altitude. This allows you to stay on
the glideslope in the short run — but at a terrible cost. You
might very soon cash in all
of your airspeed.
Let's hope that you notice the decreasing airspeed before you
stall. Using the (fallacious) idea that the throttle controls
airspeed, you shove open the throttle. This does not immediately
cause the airplane to accelerate; in fact it probably causes a slight
deceleration (which is definitely not what you need right now). It also causes
you to start climbing above the glideslope. You notice this and shove
forward on the yoke.
You might eventually stumble onto the right combination
of yoke and throttle, but the process won't be pretty.
Conclusion: trying to pretend that the airplane has
a pure up/down control or a pure fast/slow control is a losing
proposition.
The yoke works by moving certain control surfaces
at the back of the airplane. Fifty years ago, Langewiesche (reference 1) named those surfaces the flippers. He wisely
refused to call them ``elevators'' lest you think that
their primary effect was to ``elevate'' the airplane.
The flippers primarily control airspeed,4 not elevation.
Of all the oversimplified wishful-thinking ideas,
the notion that the yoke is the up/down control is the most deadly.
You may think that neither you nor anybody else would be dumb
enough to keep pulling back until the stall occurs — but the accident
statistics indicate otherwise. The stall/spin accident is the
#1 most-common type of fatal accident, year in and year out.
Stall/spin accidents occur during departure as well
as approach. Once again, during departure the airplane is normally
at or near VY, so the notion that the yoke is
the up/down control is guaranteed to be wrong — dangerously wrong.
The problem is compounded because during approach
and departure the airplane is at low altitude. At a higher altitude
you would have more time to figure out the problem, and you would
be able to regain vital speed by cashing in some altitude.
7.3 You Can Get Away With A Lot During Cruise
You may be wondering how such a dangerous notion
could be come so widespread. The answer is simple: the notion
that yoke is the up/down control appears to work, most
of the time.
Nearly all of your pilot time is spent in normal
cruising flight. Now suppose at some point you find yourself
100 feet below your desired cruising altitude. What do you do? You pull back on the yoke. This
is what everybody does. It works. There's nothing wrong with
it.
Here is the detailed analysis: You start out with
a shortage of altitude which implies a shortage of mechanical
energy. In the short term you can't change the mechanical energy,
but you can convert airspeed into altitude using the law of the
roller-coaster.
At this point you have returned to the desired altitude.
You are still low on energy, but since the new airspeed is closer
to VY, you are on a less-draggy part of the
power curve and you will eventually make up the deficit. As the
airspeed rebuilds, you gradually release your tug on the yoke.
You don't need to touch the throttle during this maneuver.
There is an important assumption in this analysis that often goes
unstated: Most pilots are very aware of their precise altitude, but
(alas) not nearly so aware of their precise airspeed. Similarly: most
flight instructors, air traffic controllers, and checkride examiners
will complain immediately if you deviate from your assigned altitude,
but they hardly ever seem to notice or care about airspeed
excursions. This is not 100% logical, but
it is a fact of life.
In this scenario, we corrected for an altitude excursion
by means of an airspeed excursion. Under the circumstances, it
was a perfectly reasonable thing to do.
For comparison, here's a scheme for correcting the same 100-foot
altitude excursion without an airspeed excursion. You notice
that you have an energy shortage, so you open the throttle a
little. The airplane will enter a nice climb, with negligible change
in airspeed. When you reach the assigned altitude, you return the
throttle to its previous setting and the maneuver is complete. You
leave the yoke and trim alone.5
This scheme might seem like the ideal way to perform
the correction maneuver, but it is very rarely used in practice.
There are a couple of reasons for this.
-
Commonly, the purpose of the flight is to get
somewhere as quickly as possible. Therefore, in cruising flight,
the throttle is already as far open as it should go. When a shortage
of mechanical energy develops, increasing the engine output is
not an option. The only option is to choose a less-draggy speed
(closer to VY) while the energy rebuilds.
- If you make a temporary reduction in speed by
pulling on the yoke, when you let go the airplane will return
to its previously-trimmed speed. It's simple. In contrast, there
is no corresponding idea of ``throttle trim''. If you
move the throttle temporarily, it is not particularly easy to
move it back to exactly the right place afterward. What's worse,
you also need to worry about the mixture control and (possibly)
the engine RPM control. Making a temporary change in power might
require moving three controls (or six controls in
a twin), and it would be an obnoxious task to get them all back
to their proper positions afterward.
I repeat that the aerodynamically logical way to fly the airplane
precisely is to trim for the airspeed you want and then manage the
altitude with the throttle. When in doubt, do it this way. If you
were a 100% logical Vulcan you might do it this way all the time.
However, during cruise, it is more convenient to leave the throttle
alone, use the yoke as if it were the up/down control, and accept
modest airspeed excursions.
It is OK to use the yoke
as if it were the up/down control provided:
-
you are on the front side of the power curve, and
- you are willing to accept airspeed excursions.
The second proviso is just as important as the first. Suppose you
decide to descend to a substantially lower altitude. You could do
this by shoving forward on the yoke and/or dialing in lots of
nose-down trim, but if you're not careful you could exceed the maximum
normal-operations speed. As always, when in doubt, trim for the airspeed you want and
then manage the energy situation by controlling engine power and/or
controlling drag.
Again: It is OK to use the yoke
as the up/down control provided:
-
you are on the front side of the power curve, and
- you are willing to accept airspeed excursions.
7.4 Let ``George'' Do It
Sometimes I get a student who says ``The yoke has to be the
up/down control. I know because the autopilot controls altitude
just by moving the yoke''.
All I can say is that autopilots are not exempt from the laws of
physics — the power curve and the law of the roller-coaster. The
same rule applies: ``George'' (the autopilot) can control altitude
using just the yoke provided you are on the front side of the power
curve and you are willing to accept airspeed excursions.
This point is so important that I will analyze the
short-field approach scenario one more time — using the autopilot.
Refer back to figure 7.4. You
start out at point A. The autopilot is using the yoke as if it
were the up/down control, trying to keep you rigorously on the
glideslope. When you decide to decelerate, you retard the throttle,
whereupon the autopilot pulls back on the yoke, keeping the airplane
on the glideslope by cashing in some airspeed. When the airspeed
reaches short-field approach speed, you re-open the throttle.
You are now at point B. Things appear OK, but there
are two things that could go wrong.
-
Suppose a momentary updraft carries the airplane
above the glideslope. The poor dumb autopilot will push forward
on the yoke. This will convert the excess altitude to airspeed.
The airplane will return to the glideslope, but since its new
airspeed is closer to VY, it will tend to climb.
The more it climbs, the more the autopilot will push forward
on the yoke. This unstable feedback process will continue until
the airplane reaches point C — the other point where the airplane
can stay on the glideslope with the chosen amount of power. Since
this point is on the front side of the power curve, ``George''
can get away with controlling the altitude using just the yoke.
This is not, of course, a good short-field approach speed.
This airspeed excursion from point B to point C will probably
leave you unable to complete the approach. You can go around and try
again. This may be disappointing, but there is something much worse
that could have happened starting from point B.
- Using the same logic, let's see what happens supposing at
point B a downdraft carries the airplane
below the glideslope. The poor dumb autopilot will pull back on
the yoke. This will convert some airspeed to altitude. The airplane
will return to the glideslope, but since its new airspeed is farther
than ever from VY, you will tend to descend. The more you descend,
the more the autopilot will pull back on the yoke.
This is crazy! The autopilot is performing the ``flare'' maneuver
while you are still way out on final approach, cashing in all your
airspeed in the vain attempt to maintain altitude! At this throttle
setting, there is simply not enough energy to carry the airplane along
the glideslope at any speed below point B, and pulling back on the
yoke temporarily disguises and permanently worsens the
problem.
We hope that the autopilot runs out of pull-back authority before it
causes the wings to stall. In either case, the airplane is going to
descend below the glideslope.
The only way out of this mess is to notice that you have an energy
shortage. The sooner you open the throttle the better off you'll be.
If you want to prevent problems of this sort, don't try to control
altitude using the yoke unless you're on the front side of the power
curve and you're willing to accept airspeed excursions. The easiest way to control both
airspeed and altitude is to trim for the right airspeed, leave the
yoke alone, and control altitude with the throttle.
7.5 Max Performance using the Power Curve
7.5.1 Best Rate of Climb
The purpose of this section is to get a deeper understanding of the
power curve, and to see how it applies to maximum-performance climbs
and descents. If you aren't interested in such details, you can skip
to the next section.
Let's start by comparing figure 7.5 to figure 7.6. As shown in figure 7.5, the highest point on the
power curve represents the best rate of climb. The corresponding
airspeed is denoted VY.
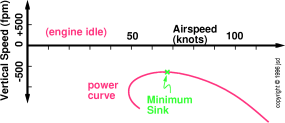
Similarly, as shown in figure 7.6, the highest point on the
power curve is the point that causes the minimum sink rate. This
gives the maximum time aloft. Again, the corresponding speed is
denoted VY.6
Not coincidentally, VY marks the boundary between the ``front
side'' and the ``back side'' of the power curve. As discussed in
section 1.2.5 and section 1.3.3, you have to
know whether you are above or below this special airspeed to know
whether speed changes will give you a long-term climb or a long-term
descent.
The value of VY will change by a few knots depending on
configuration (engine power setting, flap setting, et cetera).
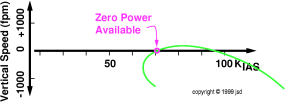
7.5.2 Zero Power Available
Another point on the power curve that is sometimes important is shown
in figure 7.7. If there is a point in the mushing regime
where the power curve crosses zero, I will call the corresponding
VZ, the airspeed where there is zero rate of climb.
In many airplanes, when the engine is developing full power there is
no such point; the airplane can climb even at the critical angle of
attack, as shown in figure 7.5. On the opposite side of the same
coin, with zero engine power, there is once again no such point as
VZ; the airplane cannot maintain level flight at any airspeed.
Therefore the
concept of VZ is only useful in certain circumstances; these
include: your
airplane's engine could be small by design, or you could be
operating at an altitude close to the airplane's absolute
ceiling, or
you could be having some mechanical problems.
Imagine you are flying at VZ, with the throttle already wide
open, and you want to climb and maintain a higher altitude. Your only
option is to dive. The dive will give you an airspeed higher
than VZ, closer to VY, and by maintaining this new airspeed you
will be able to climb.
You can see that flying at VZ just above the treetops would be a
very bad situation. You would not be able climb at VZ and you
would not be able to accelerate without diving. You are stuck. The
only solution is to make sure you never get into such a situation.
Remember that VZ is defined to be in the mushing regime; the
corresponding zero-climb point on the front side of the power curve is
completely benign. On the front side you can always climb; all you
need to do is pull back on the yoke.
7.5.3 Best Angle of Climb
We see that the power curve is rather flat on top. That means that if
you fly a couple of knots faster than VY, your rate of climb will
hardly be affected at all. You will reach your destination a percent
or two sooner, so this sort of ``cruise climb'' is generally a
sensible thing to do.
A more interesting situation arises when you don't
want to get where you are headed any sooner than necessary — such
as when you are trying to climb over an obstacle. In this case
it makes sense to climb at an airspeed a few knots below VY.
The more you slow down, the more time you will have to accumulate
altitude before reaching the obstacle. But don't get carried
away; the power curve tells you that if you slow down enough,
you will degrade the climb performance to the point where further
reductions in airspeed don't pay.
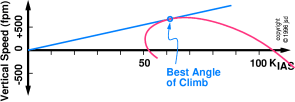
As indicated in figure 7.8, the optimum obstacle clearance
strategy (the best angle of climb) is achieved at the point where the
tangent to the power curve goes through the origin. That means that
small changes in airspeed are causing exactly proportionate changes in
rate of climb, hence no change in angle of climb. The airspeed where
this occurs is denoted VX. Larger changes away from VX can only
degrade the angle of climb.
We now consider the situation during a descent. This could happen
because the aircraft is above its absolute ceiling (which is the
normal situation for gliders) or because the engine is operating at a
reduced power level.
If all you want is maximum time aloft, you should fly at VY as
discussed above.
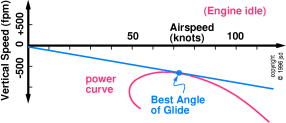
If, however, you want to clear an obstacle and/or glide to a
particular place fairly far away, you care about distance (not just
time aloft). Once again we observe that the power curve is rather
flat on top. That means that if you glide a couple of knots faster
than VY, your time aloft will hardly be affected at all, but you
will get to your destination sooner. This gives you a better chance
of getting there before you run out of altitude.
We can use the tangent trick again. The best distance
(i.e. best angle) is achieved at the point where the tangent to
the power-off power curve goes through the origin. That means
that small changes in airspeed are causing exactly proportionate
changes in descent rate.
Once again, the airspeed where you get the best angle can be denoted
VX even though in this case it is a descent angle not a climb
angle. In the particular case
where you have exactly zero engine power, the best angle occurs right
at the point where the aircraft achieves its best lift-to-drag
ratio. The airspeed where this occurs is denoted VL/D.
7.5.4 Power Depends on Altitude via True Airspeed
Let's compare high-altitude flight with low-altitude flight at the
same angle of attack. Assume the weight of the airplane remains the
same. Then we can make a wonderful chain of deductions. At the
higher altitude:
-
the lift is the same (since lift equals weight)
- the lift-to-drag ratio is the same (since it depends on angle
of attack)
- the drag is the same (calculated from the previous two
items)
- the thrust is the same (since thrust equals drag)
- the indicated airspeed is the same (to produce the same lift
at the same angle of attack)
- the true airspeed is greater (because density is lower)
- the power required is greater (since power equals lift times
TAS)
The last step is tricky. Whereas almost most of the aerodynamic
quantitites of interest to pilots are based on IAS, it is TAS that
appears in the power-per-thrust relationship.
This means that any aircraft requires more power to maintain a given
IAS at altitude. This applies to propellers, jets, and rockets
equally.
Another way of getting the same result is to observe that the drag
force is the same, so getting from point A to point B
requires the same amount of energy — since energy is just force times
distance. On the other hand, at altitude the airplane gets from A
to B more quickly, because of the increased TAS. This requires more
power — since power is energy per unit time.
This has no direct effect on VY or VS, or on the general shape
of the power curve; it just shifts the curve downward by a scale
factor. At high altitudes, this shift will have a huge effect on
cruise speed and rate of climb.
7.5.5 Other Power and Altitude Effects
There are lots of additional insights to be gained
from thinking about the power curve and its tangents.
-
During a descent, the airspeed for best (flattest)
angle of descent is necessarily greater than the airspeed for best
(slowest) rate of descent. This might not have been obvious from
the numbers in your POH.
- During a normal climb, the airspeed for best angle
is necessarily less than the airspeed for best rate of
climb.
- As the rate of climb decreases (due to increased power
required, reduced throttle setting, or whatever) VX increases and
gets closer to VY. An interesting case occurs when the airplane is
at its absolute ceiling. Then there is barely
enough power to maintain level flight at VY. The tangent
(through the origin) is horizontal, so VX must be
equal to VY.
Previously (section 7.5.4) we considered how much power
was required as a function of altitude, without any mention of
how much engine power you were actually using. Now we consider the
effects of engine power.
You might choose to change the engine power, or you might be forced to
do so. As altitude increases, sooner or later its power output will
decrease. Any power-change will cause small distortions in the shape
of the power curve. Let's try to understand why.
Recall that VY(100) denotes the airspeed for best rate of climb
when the engine is producing 100% of its rated power, while VY(0)
denotes the airspeed for minimum sink (best endurance) with zero
engine power.
 Figure 7.10
: Power Curve Affected by Engine &
Propeller Efficiency
It would be nice if engine efficiency and propeller efficiency
were independent of airspeed, but this is only approximately true.
Designers often sacrifice a little climb performance in order to get
better cruise performance. This means that the effect of engine
power is to raise some parts of the power curve more than others, as
shown in figure 7.10.
In particular, points to the right of VY(0) are raised a little
more than points to the left thereof. As a consequence, VY(100)
must sit somewhere to the right of VY(0).
At intermediate power settings, VY is somewhere
between VY(0) and VY(100). The shift is usually not large.
One reason why efficiency depends on airspeed is propeller
slip. The propeller is not a solid disk that throws the air straight
backwards; there is a certain amount of leakage between the blades and
around the edge of the disk. Actually, propellers are typically about
80% efficient at cruise, which is surprisingly good.
At a given engine RPM, propeller slip depends in
complicated ways on the indicated airspeed (which determines the
drag on the airplane, hence the load on the propeller) and on
true airspeed (which determines the angle at which the blades
meet the oncoming air).
Taking the efficiency to be independent of airspeed is a reasonable
approximation for constant-speed props7 but not
as good for fixed-pitch props.
Propwash over the wings changes the stall speed,
which moves sideways the leftmost points on the power curve.
Other propwash effects fiddle with the curve in various minor
ways.
7.5.6 Wind Effects
VY is not affected by wind (because it only involves altitude and
time, not distance). On the other hand, if
you are gliding into a headwind toward a distant objective, you want
to glide a little bit faster than in the no-wind case, because you
want to give the wind less time to push you away from your objective.
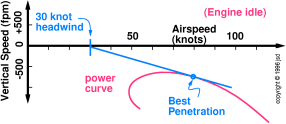
Once again we can use the tangent construction, as
shown in figure 7.11. If there is a 30-knot headwind,
the tangent should go through a point 30 knots to the right of
the origin. Because of the shape of the curve, the point of tangency
does not move 30 knots, but only about 7 knots. Glider pilots
call this point the penetration speed. As a rule of thumb, when gliding into a moderate
headwind, increase the glide speed by about a quarter of the windspeed.
When gliding with a tailwind, you can go farther by gliding a little more slowly
than in the no-wind case, but not by very much. Even with an infinite
tailwind, it would never pay to glide more slowly than VY.
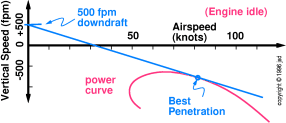
If you are gliding through a downdraft, you want to fly a little
faster so you can get out of it as soon as possible. The construction
in figure 7.12 can be used to analyze the situation. Given
a 500 fpm downdraft, the tangent should pass through a point 500 fpm
above the origin. By the same token, if you are flying through an
updraft, you want to stay in it as long as possible, so you can
reduce the glide speed. The tangent should pass through the
appropriate point below the origin.
7.5.7 Weight Effects
A Cherokee Six is a rather popular airplane. It
has very good load-carrying ability; more than half of the legal
max gross weight is useful load. Even allowing for a bantamweight
pilot and a modest amount of fuel, you can imagine flying it at
half of max gross weight.
For reasons discussed in section 2.12.4,
at reduced weights every point on the power-off power curve is rescaled
to a lower speed. In particular, if the weight is reduced by a
factor of 0.5, the stalling speed, the best-endurance speed, the
maneuvering speed, etc. are reduced by a factor of 0.707 (a 29%
reduction). The vertical speeds are reduced by the same factor.
This is shown by the lower two curves (the power-off curves)
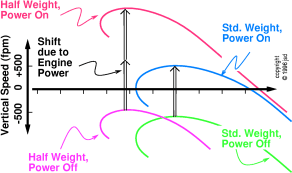
in figure 7.13.
Start with the standard-weight, power-off curve,
then shrink it. For each point, the new airspeed is 71% of the
old airspeed, and the new vertical speed is 71% of the old vertical
speed. This produces the half-weight, power-off curve.
Now, when we apply power, the full-weight curve moves
up by about 1000 feet per minute, thereby turning a 500 fpm descent
into a 500 fpm ascent at VY. When we apply
power to the half-weight airplane, the same amount of energy is
devoted to lifting half as much mass, so the curve shifts by twice
as much — 2000 fpm. The best rate of climb is more than 1500
fpm.
The cruise speed increases a little at the lighter weight, but not by
very much. This is because almost all of the drag at high speeds is
parasite drag, which depends on the shape of the
airplane, not on its weight or angle of attack.
7.6 Variations in the Power Curve
As mentioned in section 1.2.5, the general shape of
the power curve is more-or-less the same for all
airplanes, but there are some variations.
7.6.1 Power Curve Depends on Aspect Ratio
Consider a typical airplane in which the stalling
speed is 60 KCAS and VY is 75
KCAS. We know that VY depends on a balance between induced drag
and parasite drag, so let's consider what happens if we rearrange
things a little bit.
In particular, imagine replacing the wings. The new span will be
twice as large, and the new chord will be half as large. This leaves
the wing area unchanged, but increases the aspect ratio (the
ratio of span to chord) by a factor of four.
In the modified airplane, the stalling speed will be very nearly the
same, since this depends mainly on wing area. Also the parasite drag
will be more-or-less unchanged.
However, the amount of induced drag at any particular airspeed will be
less, since the long wing doesn't need to produce such strong wake
vortices, as discussed in section 3.12.3.
Therefore VY will no longer by 75 KCAS. We can fly slower
(thereby reducing parasite drag) without incurring a proportionate
increase in induced drag.
The same thing happens if you do something that increases the parasite
drag, such as towing a banner. The airspeed VY representing the
optimal tradeoff between induced and parasite drag shifts to a lower
value.
In the extreme case of a high aspect ratio and lots of drag, VY
might be only a few knots above the stall. You could reasonably take
off, fly around all day, and land, without ever operating on the back
side of the power curve.
At the other extreme, consider an airplane with a short wingspan, lots
of chord, and not very much drag. A typical fighter jet is a good
example. For such a plane, VY is very much higher than the stall
speed. Takeoff, landing, and many other maneuvers must be conducted
quite far back on the back side of the power curve.
7.6.2 Sketching the Curve
If you know a few points on the power curve, you can sketch the whole
curve. As mentioned in section 1.2.5, the general
shape of the curve is the same for all airplanes, so you just need to
shift and rescale the curve to fit your particular airplane's
performance numbers.
Some of the numbers are easy to obtain, while others are not. For
instance:
-
The power-off and power-on stalling speed can be obtained from
the POH, and can be easily measured. The corresponding rates of
descent generally cannot be obtained from the POH, and would be very
hard to measure.
- The POH gives the airspeed for best rate of climb, and the
resulting vertical speed.
- The POH gives the airspeed for best angle of glide, and
resulting angle, from which you can infer the vertical speed.
- The cruise airspeed can be obtained from the POH. At cruise
power setting, the rate of climb at this speed is zero by definition.
But what is the power-off rate of descent at this airspeed? You
cannot find that in the typical POH, so you may want to measure it
experimentally.
You need an estimate of the cruise-airspeed power-off descent rate in
order to plan your descent as you approach your destination, or when
ATC asks you to cross a surprisingly-nearby fix at a surprisingly-low
altitude.
On the other hand, the rate of descent at stalling angle of attack
doesn't usually matter, because if you cared about rate of descent
you'd be flying at some other airspeed.
I don't know all the details of the power curve for the airplanes I
fly, and unless you are an airplane designer or test pilot, you
probably don't need to know the details either. Accurately measuring
the entire power curve is (a) unnecessary, (b) much harder
than you might think, and (c) beyond the scope of this book.
7.6.3 Some Theory
The following mathematical formula may be of additional help in
sketching and understanding the power curve. Using the basic
lift/drag model introduced in section 4.4, we expect
that
|
|
| dissipation at V |
|
| dissipation at VY |
|
=
0.75 |
|
+ 0.25 |
|
(7.1)
|
There is a discussion of coefficients, forces, and powers in section 4.4. See also section 4.5.
7.6.4 Power Requirements versus Speed
Suppose we want an airplane with a reasonably high cruise speed. How
much power does it take?
In particular, let's suppose our airplane can stay airborne at an
airspeed of VY = 75 KIAS, using 100 horsepower (at a particular
altitude). Now lets suppose we want the cruise speed to be double
that speed, namely 150 KIAS (at the same altitude). Then we expect
(based on the formula given above) to need 240 horsepower during
cruise.
If we want to double the cruise speed again, to 300 KIAS, we need to
increase the power to over 1600 horsepower! We see that in the
high-speed regime, doubling the power causes an eightfold increase in
the parasite drag power. (The total increase in dissipation is
somewhat less than eightfold, because the induced drag component isn't
increasing.)
Note that when you increase the airspeed from 75 to 150 KIAS, the
power goes up by a factor of 2.4 but the gas mileage gets worse by
only 20%. That's because mileage depends on fuel per unit distance, not fuel per unit
time, and you would get to the destination in half the time.
Similarly, when you increase the speed from 150 to 300 KIAS, the
power goes up by a factor of 6.8, but the gas mileage gets worse by
only a factor of 3.4.
Of course, you can reduce the power requirement (and fuel requirement)
by redesigning the airplane to reduce the coefficient of parasite
drag, but big improvements are usually not very easy to achieve.
7.6.5 Power Requirements versus Altitude
The previous section considered different speeds at the same altitude;
now we consider different altitudes at the same indicated airspeed.
The angle of attack is the same, the lift force is the same (just
equal to weight), and the drag force is the same — all independent
of altitude, if we keep the indicated airspeed the same.
However, this does not mean that the required power remains the
same. The drag power is equal to the drag force times the airspeed
(true airspeed, not indicated airspeed). This means that for any
given cruise IAS, the power required grows as a function of altitude,
in the same proportion as the TAS/IAS ratio.
This puts a limit on how high you can fly, even if you have a
turbocharged engine whose output is independent of altitude.
To look at the same fact another way, let's consider speed at constant
power (rather than power at constant speed). Assuming constant
engine power, if your cruise altitude is higher your indicated
cruising speed must be lower (closer to VY), so that you can
operate at a point on the power curve appropriate to the reduced power
available.
At any altitude where you have plenty of power, the IAS is large
compared to VY and drops only slowly as the available power
declines (because power depends roughly on the cube of the IAS).
In this regime the TAS is increasing even as the IAS is dropping. In
contrast, as the altitude approaches the absolute ceiling, the cruise
IAS is near VY, small changes in IAS don't make much difference,
and any decrease in available power causes the IAS to drop toward
VY so fast that the TAS drops, too.
7.7 Energy Management Stunts
7.7.1 High-Speed Steep Descent
Here is an anecdote that illustrates a peculiar technique for getting
rid of energy in a hurry. I tried this once, back when I was
a private pilot with about 100 hours' experience. I was
approaching
a tower-controlled airport and had requested landing clearance.
Unfortunately, the tower controller was tied up for a while, talking
on his land-line. Eventually he said, ``cleared to land,
if you can make it from there''. The problem was that I was
2000 feet above the runway, and less than two miles from the touchdown
zone. That makes a ten degree glide slope — pretty darn steep.
The wisest thing would have been to foresee and avoid the whole
situation; that is, I should not have allowed myself to get so close
at such a high altitude. Failing that, the next-wisest thing would
have been to request approval for a 360° turn, so I could lose
altitude smoothly.
However at that point in my pilot career I had more aerodynamic
knowledge than wisdom, so I used another (rather unprofessional)
method for getting rid of the excess energy. As a flight instructor I
really don't recommend this technique, but as a physicist I have to
admit that it works (if properly carried out) and it illustrates a
couple of interesting points about energy management.
Anyway, here's the story: I accepted the clearance,
immediately extended full flaps, reduced the power to idle, and
dived at the ``top of the white'' — the maximum allowable
flaps-extended airspeed.
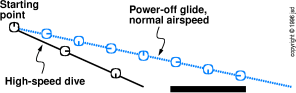
The situation is illustrated in figure 7.14,
which compares my steep, high-speed glide with a normal power-off
glide. To give an indication of speed, the figure shows a stopwatch
symbol every 15 seconds along each path.
The high-speed dive was different from the normal
approach in several ways:
-
At each instant, the airplane was at a lower
altitude than it would have been if I had flown a normal-speed
approach. (Compare the altitude of corresponding stopwatches in
figure 7.14.) This is because my chosen airspeed
was on a very draggy part of the power curve. I was relying on
this to solve my energy problem.
- At each instant, the airplane was closer to the
airport than it would have been if I had flown a normal-speed
approach. (Compare the horizontal position of corresponding stopwatches
in the figure.) This is an unavoidable consequence of the higher
airspeed. It was unhelpful, because it meant I had less time to
get rid of the excess energy.
- Effect (1) was bigger than effect (2). That
is, the drag increase was disproportionately larger than the airspeed
increase. This is true anywhere on the front side of the power
curve, at speeds greater than VL/D. (As discussed
in section 7.5, at speeds near VL/D,
a small increase or decrease in airspeed leaves the direction
of flight unchanged; you just move a little faster or slower along
the same glidepath.)
- Even though I was cashing in altitude energy
at a prodigious rate, I had to remember that at each instant I
had more airspeed energy than I would have had normally.
I needed a plan to deal with this surplus at some point.
If my high-speed glidepath had taken me directly
to the runway threshold, I would have arrived at the threshold
with far too much kinetic energy, and would have had a hard time
landing the plane.
Fortunately, I could tell early in the maneuver
that my glidepath led to a point about an eighth of a mile short
of the runway. About a quarter of a mile from the runway, as
my glide intercepted the normal glidepath, I smoothly pulled back
on the yoke. This flare-like maneuver brought the airspeed down
to normal. I retrimmed appropriately. I was then able to follow
a steep but non-ridiculous power-off approach path the rest of
the way to the runway, at a normal airspeed, followed by a normal
flare and landing.
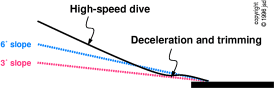
This strategy — diving at a very high airspeed toward
a point short of the runway, so there will be enough time and
distance left to get rid of the excess airspeed, is diagrammed
in figure 7.15. I reiterate that this stunt is
not normal pilot technique. Still, it is a good energy-management
illustration, and sometimes it is helpful during forced-landing
practice.
Remember that the flaps are not the only way of getting rid of
unwanted energy. Depending on what type of airplane you fly, you may
prefer a high-speed slip and/or extending the landing gear
early. You can also make a circle or two.
7.7.2 Low-Speed Steep Descent
Looking at figure 7.9, you may suspect that
you can increase the angle of descent by
flying at speeds well below VL/D. In principle, this is possible
— but such a procedure is even more unwise and unprofessional than
the high-speed procedure discussed in the previous section.
The main problem is that by the time you achieve
a significant increase in descent angle, your airspeed will be
much too close to the stall. A slight gust, windshear, or
imperfection in pilot technique could cause a stall. Remember,
stalling on approach is the #1 way to cause a fatal
accident.
A secondary problem with such a procedure is that it probably involves
such a nose-high pitch attitude that you can't see where you are
going. A third problem is that you might not have enough energy to
flare; if you try to raise the nose too quickly it will just
cause an accelerated stall.
It is possible to construct scenarios (such as landing on a very short
runway with an obstructed approach)
where a steep descent on the back side of the power curve is the only
way to get the job done. However, before attempting such a task, you
should make sure you have the appropriate specialized training and
practice. In most cases it is wiser to
just choose a different place to land.
7.7.3 Skimming in Ground Effect
Here is trick for saving a little bit of energy. I hope you
never get into a situation where you need to use this trick — but it
might save your bacon if the situation arises.
Suppose no engine power is available, and the aircraft is too low
and/or too far from the desired landing place. Using our
energy-management logic, we see that the only real way to stretch the
glide is to find a low-drag mode of operation. The solution
is sort of the reverse of a soft-field takeoff
(section 13.4) — you should make use of ground
effect.
Specifically, the procedure is to maintain best-glide
speed8
right down into ground effect, even if this means that you enter
ground effect over the swamp a tenth of a mile short of the
intended landing place. Once you are in ground
effect, start pulling back on the yoke. Because there is very
little induced drag in ground effect (as discussed in connection
with soft-field takeoffs in section 13.4), the airplane
can fly at very low airspeeds with remarkably little drag. You
can then fly all the way to the landing area in ground effect.
It is like a prolonged flare; you keep pulling back gradually
to cash in airspeed and pay for drag. This technique will not
solve all the world's problems, but it is guaranteed to work better
than trying to stretch the glide by pulling back before entering
ground effect.
Conversely: if you are approaching a short runway
and have a few knots of excess airspeed on short final, you should
pull back on the yoke and get rid of the excess airspeed before
entering ground effect. If you think you can't get rid of it
on short final, remember it will only be harder to get rid of
in ground effect. A timely go-around might be wise.
If you want to practice skimming in ground effect,
find a long, long, long runway to practice on, and be careful
not to run off the far end.
7.8 Summary
Most pilots are very aware of their precise altitude, but (alas) not
nearly so aware of their precise airspeed or angle of attack.
The airplane is trimmed for a definite angle of attack,
and hence (more or less) a definite airspeed. The yoke is part
of the angle-of-attack control system. Pulling back on the yoke
will always make you slow down.
If you are on the front side of the power curve and
if you don't mind airspeed excursions, you can use the yoke as
a convenient, sneaky way to control altitude. This is because
airspeed is linked to altitude via the law of the roller-coaster
and via the power curve.
Warning: just because this works OK 99% of the time,
don't get the idea that it works all of the time. Bad habits
are easy to learn and hard to unlearn. Do not get the idea that
pulling back on the yoke always makes the airplane go up. On
the back side of the power curve, it doesn't work — and might
kill you. In critical situations (including approach and departure),
you simply must control the airspeed using the yoke and trim.
The throttle controls power. Power is energy per
unit time. To overcome drag requires power. To accelerate requires
power. To climb requires power.
In flight, if you open the throttle a normal airplane
will not accelerate — it will climb.
Whereas opening the throttle causes energy to enter
the mechanical system, you can also encourage energy to leave
the mechanical system by extending the flaps, the spoilers, the
landing gear, etc., and/or by choosing a draggier place to sit
on the power curve.
If you want to fly precisely, you need to look at
the altitude and the airspeed, size up the energy situation,
and then decide what to do with the yoke and the throttle.
- 1
- Once again, this assumes the
airplane is in flight (not resting on its wheels) so that the
trim mechanism is effective. This also neglects the small nonidealities
discussed in section 6.1.4.
- 2
- Be careful to call these the ``power versus
time'' curves. If you shorten this to ``power curve'', people will
think you mean the power-versus-airspeed curve.
- 3
- ...for reasons discussed in
section 6.1.4.
- 4
- ...or (more precisely) angle of attack, as discussed
in chapter 2.
- 5
- ...except for perhaps using the yoke to prevent
slight phugoid oscillations at the beginning and end of the climb,
where the pitch attitude changes.
- 6
- The term VY is defined to
be the airspeed for best rate of climb. It applies even when the rate
of climb is negative.
- 7
- ...which incorporate a
governor that adjusts the pitch of the propeller.
- 8
- Actually you might want to fly a tiny
bit faster than best-glide speed, so you enter ground effect sooner.
[Previous]
[Contents]
[Next]
[Comments or questions]
Copyright © 1996-2001 jsd